Month: December 2012 (Page 1 of 2)

Dry stone walling – Day 15

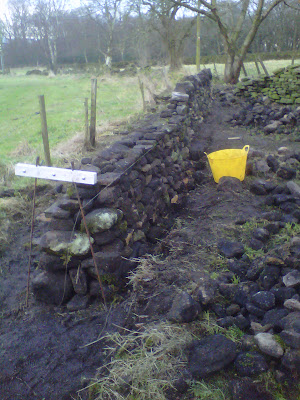
It has been wet today.  Really wet.  However, by the end of the day there is only a couple of courses to go and the coping stones can go on this part of the wall.  Once you pass the midpoint on the wall (and install the throughstones), the whole process seems to speed up – not surprising considering the top of the wall is only half the width of the base of the wall.

While it has been relatively warm today, it has been really windy and wet.  This has made working outside hard work.  The main issue is that the ground surrounding the base of the wall becomes very muddy and slippery – you would not want to slip carrying a heavy stone.  I made a “duck board” using some spare wooden decking.  This works a treat, although it could do with being a bit longer.

I reckon one more day and we will be ready to put the coping stones on the top of the wall.

Day 15 and a “duck board” to combat the mud!
 

Dry stone walling – Day 14

Yup, back to dry stone walling after an enforced break for a dose of man flu and Christmas!

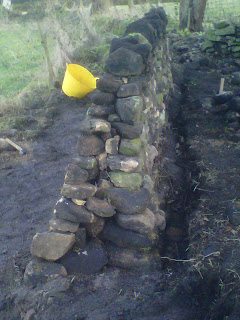
It is back to laying foundation stones and the first few courses.  This is a slow process as the base of the wall is at it’s widest at the bottom.  The fact that the field levels are slightly different also doesn’t help.  The weather was relatively warm, but the downside was that it rained later in the afternoon.

Day 14
Day 14

Roof space

The roof space is effectively three roof spaces – one for each of the cottages.  Two end walls with a wooden “A” frame in between the two.  The “A” frames look in reasonable condition.  I have had a look in the roof space in one of the other cottages and the construction is the same.

The roof is constructed using traditional stone slates (called Yorkshire Greys).  These have a single hole in the top and a wooden peg that us used to hook them over wooden battens.

I have no idea what this tells us about the date of the construction.  The one thing that strikes me as odd is that the end walls seem to have been painted.  Not quite sure why anyone would want to want inside the roof space.

Old beam – Secrets revealed

There are old beams throughout the properties, but all (yes, all) are boxed in.  As such, we couldn’t tell what the beams look like or even the condition of them – it would not be unusual for these beams to suffer from woodworm or even worse.

So we decided to take some of the cladding off in one of the cottages.  The beams aren’t particularly unusual – rough sawn on one side and curved on the other.  Presumably the curved shape is the natural shape of the tree.

The beam had been coated in multiple coats of paint, probably distemper (a paint usually based on lime or chalk). Much of it was flaking and loose.  A slight circular depression in the beam was a hole that had been drilled through the beam – probably 12mm across – that had been stuffed with newspaper and painted over. We pulled the newspaper out and gently attempted to unravel it.  Unfortunately, it was very fragile and most of it disintegrated.  However, we were lucky and we manage to salvage a very small piece with a date – 1858!

Further investigation, revealed a much larger rectangular depression similar to the round one we found above.  This one was a slot that had been cut right through the beam.  Both sides were stuffed with newspaper and painted over.  However, in the middle of slot behind the stuffed newspaper was half a broadsheet from the Leeds Murcury – also dated 1859!


From the census records of 1851 and 1861, we know that David Hobson was living in this property with his family, so we had hazard a guess at who bought the newspaper originally.

Dry stone walling – Day 13

It has been very wet recently and that area around where I have been working is very muddy and slippery.  I have decided not to do any dry stone walling here while it is so wet – a slip in the mud carrying a large stone could very easily spell disaster. 

With such much wall to repair around the property,  I thought I would turn my attention to a spot that needed to be repaired.  In the top field, there is a piece of wall where the coping stones are only just clinging on.  I haven’t attempted just to repair a section of wall before, so I didn’t really know what to expect.  The key factor seems to limit the amount of wall that needs to be repaired! As soon as I removed a couple of the coping stones, a whole section of wall collapsed.  You need to have your wits about you and do wear a pair of steel toe cap boots.

The section of wall needing repair.  This photo was taken last summer.

I put the coping stones to one side.  Separated out the building stones and put the hearting (there was a lot of it) in a wheel barrow.  All in all, it only took an hour to rebuild.  The most difficult thing was finding enough coping stones to cover the top of the wall.  I found some of them buried in the grass (this wall must have started falling about some time ago) and a few others elsewhere.

The repaired wall – a few more running joints that I really wanted, but I didn’t want to have to rebuild a huge section

Dry stone walling – Day 12

The latest section of wall in the orchard is now complete.  It is only 5m, but it is very rewarding to put the coping stones on.  It never seems to take very long – possibly just 15 mins – to put the coping stones on.  It is made all the easier by separating the coping stones as I have been rebuilding the wall.


Day 12 – Dry stone walling

Sharpening a chainsaw

Well, according to a number of sources, as a rule of thumb you should sharpen the chain on a chainsaw every time you refuel it.  You can also tell when it requires sharpening because of the sawdust – a sharp chainsaw produces long strips of wood as sawdust rather than very fine dust.

I found this video on YouTube that was really helpful: http://www.youtube.com/watch?v=qvcCh2XqEPc This is one of a series of Stihl chainsaw videos and they are well worth watching.

You can find the sharpening kit here on Amazon: http://www.amazon.co.uk/Stihl-Sharpening-5605-007-1027/dp/B002YQ4SG0/ref=sr_1_9?ie=UTF8&qid=1355176663&sr=8-9

I found the process very easy to do and it only took around 20 minutes.  I reckon that I will be able to do this even quicker with a bit of practice. It has made a massive difference to the cutting performance of the chainsaw.  Do make sure that you get the right size sharpening kit for your chainsaw – they come in different sizes to match the chain.  Much cheaper than buying a new chain.

Scrap book: Windows

I guess one of the first questions is around wood vs plastic.  There is a certain snob value about the windows being wood, but modern plastic (uPVC) windows have come along way especially since they are available in colours other than white!

Coloured uPVC windows.  In many of the older properties in this area the windows are increasingly cream or a sort of duck egg blue.  Both of which are a vast improvement on white!

Go for Class A – these are the highest rated in terms of energy efficiency.  The rating system works the same way as it does for fridges and freezers.  Windows like fridges used to be only available in white, but things are changing.

The windows need to be airtight.  We know the wind rattles around the property when the weather is bad, particularly at the front of the property.  In our current house, the wooden windows and frames (although relatively modern) don’t really fit that well and you can feel a draft inside when the wind gets up.

Since we are planning on using underfloor heating, the insulation of the property is important and making sure that the windows fit is a good starting point!

http://eygwindows.co.uk/

Clearing the top field

In the top corner of the bottom field, the brambles and nettles had pretty much taken over.  It was very difficult to get access to this area in the summer due to the undergrowth.  Well, a couple of hours with a metal bladed strimmer soon had this area under control.
 
This part of the field is bordered by a small crag.  There are some trees that are growing either at the top of the crag, or in the crag itself.  Because of the canopy of the bigger trees, the smaller trees underneath have died.  I had one of these (an old Hawthorn tree) removed early in the week and cut the tree into logs.  It is amazing how much wood has come out of such a smallish tree – there were 4 wheelbarrows of logs from this single tree. 
 
Once the undergrowth has dried back a bit, I will burn this material on a bonfire.
 

Planners input on the Bat Survey

We had a bat survey completed back in August and the survey was submitted as part of the planning application.  The survey showed no evidence of bats living in the property or the outlying buildings.

Bats

The submitted bat survey has identified some limited bat activity around the site but no evidence of bats
emerging from the buildings, although these were identified as having some potential. No further information is required.
 
The following recommendations should be followed and conditioned as appropriate:
  • All roof coverings and fascias should be removed carefully by hand
  • Should any evidence of bats be found, all works should stop and advice sought from the bat surveyor or Natural England.
Given the loss of potential bat roost features as a result of the proposal, we would suggest that one bat roost feature is incorporated into the development. Preferably, this should be an integral feature (e.g. a ‘bat brick’) or if this is not possible, an external, long-lasting ‘woodcrete’ type bat box.

Guidance is given via the following link:

Bat roost features should be sited away from artificial lighting and should not be located above windows and doors.

Swallows
In the course of the bat survey, an occupied swallow nest was identified in the existing lean-to building at the north-east side of the site. Works to this section of the site (which may cause destruction of nests or, disturbance to the resident swallows) must not take place during the bird breeding season (late March to August) or until the young have fledged.

In line with the NPPF, It would be beneficial if this nest could be retained in the final scheme. If not, then if possible, a replacement swallow nesting feature should be incorporated into the scheme in line with the following guidance:
http://www.rspb.org.uk/wildlife/birdguide/name/s/swallow/encouraging.aspx

Swallow nests require an open access throughout the breeding season, so are best suited to outbuildings, sheds or garages.

« Older posts

© 2024 Hagg Leys Farm

Theme by Anders NorenUp ↑