Category: drawings

Traditional king post roof truss

The existing cottages have three original king post roof trusses that date back to the 1700’s.  We have replaced the tie beam on the middle cottage and then replaced 6 purlins through the 3 cottages (2 were later replacements and 4 were cracked).  We have used reclaimed oak with all the replacements to ensure that it matches the existing timbers. 

In addition, we replaced around 50m of wall plate (this is timber that runs along the top of the wall and carries the ends of the rafters). 

Other than that the existing oaks timbers were simply sandblasted to clean off the years of muck.  They will be treated with a wood preserver later.

A traditional King Post roof truss.  This is the configuration that we have in our property.  There are three in the existing properties.

A traditional King Post roof truss. This is the configuration that we have in our property. There are three in the existing properties.

Dry stone walling – Day 7

I have started working in the top corner of the orchard.  On Day 6, I dismantled what was left of the existing wall and it is amazing how much stone can come out of such a small section of wall, particularly when many of them are deeply embedded in the ground – they must have fallen off the wall many years ago.
 
 
So Day 7 started with digging out the foundations.  This involves removing all of the stones down to the subsoil – you can tell when to stop because the soil changes colour.  All dug by hand with a pick and shovel. 
Day 7 – Foundations dug
I established the route of the wall by using a line along the existing part of the wall.  You can just see the yellow line in photograph above.  Once this is worked out, I put up the two end frames that define the angle (referred to as “batter”) of the wall – 600mm at the base of the wall and 300mm at the top of the wall.  The wall is 1 metre high (well, when measured from the other side of the wall that is lower.
Once the foundations are dug, it is time to build the wall – one layer at a time.  At the end of Day 7, the first metre of wall is up and the coping stones are now placed on top.
 
Another metre of wall

Day 7 – today’s efforts

A 3D view…

3D artist’s impression of the renovations

The plans have now been submitted to the local planning department and although the 3D drawings are not part of the planning process, they do provide a clue to what the building will look like when finished.  You can see the main building is left pretty much as it is today (although minus the conservatory).  The barn on the end has become the corner of the L shape which is then extended out for the lounge and the master bedroom.

The roof line on the extension stays constant even though the ground rises upward.  The rooms inside flow when the natural rise in the land.  The garden area is split into two distinct spaces – a lower garden accessible from the lounge and a higher garden accessible from the master bedroom.  The roofline in the extension is at a lower level than the main house (pretty much as it is today) to give a clear separation between old and new.

Clearing out the orchard

I have spent the past couple of weekends clearing out much of the undergrowth and old trees from the orchard.  I haven’t cut down any of the fruit trees, but I have taken out the other trees that had grown in between.  It must have been years since any of this land was cared for.  I can’t believe how much I have taken out  of such a small piece of land.  This space looks so mucher bigger now.  I have left all of the sheds in place (for now) – there are two fairly large sheds here.

Stihl 017 Chainsaw – Newly Serviced!


I did get my chainsaw serviced during the week and this has made a tremendous difference.  Rapid Hire Centre in Honley (my local Stihl dealer) serviced it same day as well as fitting a new chain.  I notice that they have also turned the guide bar over so it wears equally on each side (hence the Stihl logo on the guide bar is now upside down). They have done a great job and are local – very local.  Shame their website doesn’t mention that they are a Stihl dealer plus their latest catalogue is 2010.

I am not a great fan of chainsaws. Pretty dangerous and things can go spectacularly (and disastrously) wrong if you aren’t careful.  They need to be treated with care and respect.  I tend to plan the cuts, clear the area, make the cut and then turn the chainsaw off before clearing the area and starting the process all over again.  This means that the work is slow and methodical, but it also means that there is no debris in the area to trip over (I don’t even want to think about falling over carrying a running chainsaw!).

There’s probably another day or so’s work here to tidy things up.  As well as the over grown trees in the orchard, there is a large tree in the one corner with what appears to be storm damage.  This needs tidying up.  I made a start, but the light was fading fast.

The smaller upper branches are now on a rather large bonfire.  The more substantial pieces have been cut up into logs.  It will be a year or so before they are ready to burn, but I am sure that I can find a good home for them!

Dry stone walling: Day 2

Well after the progress made yesterday – wall dismantled, foundations dug and first course laid – today was somewhat disappointing.  Disheartening even.  In 4 hours, I managed 6 or so courses and the 2m section of wall I was working on reached about 0.5m, maybe less.  The main problem (besides my lack of skill) is that most of the stones that make up the wall are pretty much rounded boulders.  The rock is made up of very coarse gritstone which is very soft and crumbly – you could try and shape it with a hammer, but that is going to be real hard work.
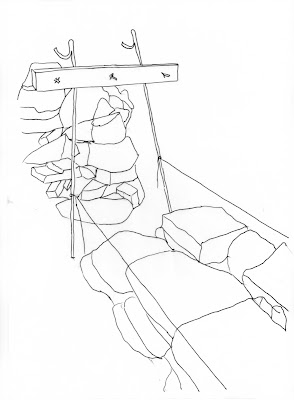
Setting out the new section of wall


So what do you do? In short, no idea.  Looking at the surrounding fields, the same problem is present – walls (or what used to be walls) made up of rounded gritstone.  There are some walls on the property that are made from a much finer sandstone and the stones here are much flatter with defined angles.  I would imagine that the stone for these walls has been brought in from elsewhere, but probably not too far away.
Option 1: Bring in building stone and remove the old boulders.  This isn’t going to work.  The new stone would cost a fortune to buy on this sort of scale, plus what would you do with the old stone?  This seems like a sledge hammer to crack a nut.
Option 2: Rebuild the wall using the existing gritstone.  Improving the wall isn’t going to be hard as part of it has fallen down and even if it hadn’t, it could do with being straight!  It won’t be perfect, or pretty for that matter, but it will do the job.  Since the wall does have some building material in it, I could sort these stones out and use them to repair some of the walls nearer to the house. 


Not much for two days work – a (very small) wall and a lot of left over boulders


As far as I can see, Option 2 is the only real practical solution.  I could do with getting some advice from someone with a lot more experience than me.  Just in case I am missing something obvious – it is a lot of work for some to then point out that there was an easier solution!

The next step has to be looking at the other field walls and finding a section that is relatively intact.  This will give an idea of the size and proportion of the walls.  I can then see if we can build something that is similar.  Ho hum.

The farm today (drawings)

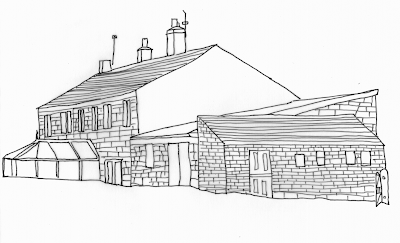
Here’s a couple of drawings of the farmhouse as it is today.  The second drawing shows the property in less detail, but labels up the different parts that go to make up the building.  You will find photos of the property here.

The cottages were originally three cottages (8, 9 and 10 Hagg Leys).  It was only in the 1990s that numbers 9 and 10 were converted into one property – known as 10 Hagg Leys today.  We plan to join all three cottages together and connect it to the barn.


Drawing of the existing properties
Drawing of the property today


The barn is a simple construction with a sloping corrugated roof.  There are two floor levels inside the barn.  The lower floor level is probably at about the same level as floor level inside the cottages themselves. The current plan is that the barn will form the corner of an extension that will be at a right angle to the existing cottages.  Thus forming an “L” shape.


Outline drawing of the existing properties
The different parts that make up the property


Attached to the barn is another building with a lean-to roof.  This time the roof is made up of stone tiles.  It is believed that this building was used to prepared food for animals.  For want of a better label, I have called this the “piggery” since we believe that the food prepared here was destined for pigs. This building is likely to be demolished as part of the renovation and wherever possible the materials reused elsewhere on the site.

© 2024 Hagg Leys Farm

Theme by Anders NorenUp ↑