Month: November 2012 (Page 1 of 2)

Muck boots

I have been suffering recently with cold feet.  The weather has turned wintery and standing building a wall doesn’t help with the circulation to the feet.  I tried wearing thicker socks.  I tried wearing more socks.  No luck.
The solution was a new pair of wellies! Yep, I couldn’t believe it either.  I came across Muck Boots in a shoe shop in Huddersfield.  They are neoprene with a rubber outsole around the foot area.  The neoprene seems to cover the whole of the inside of the boot.  Boy, they are warm.  Very warm.  On the second day, I decided that I didn’t need such thick socks.  They are exceptionally comfortable and I have been working in them all day without any problems.  They don’t have a reinforced toe cap, but they are fairly solid.


Derwent Muck Boots

More information on the website here.  Seems that everyone knows about these (except me). Always the last to know!

Dry stone walling – Day 9

It rained and it rained.  I put on some foul weather gear.  But after about 30 minutes I had to admit defeat – the area around the base of the wall had turned to a quagmire – I was slipping and sliding all over the place.  When carrying large stones this seemed like a recipe for disaster.  Time for a new plan.

I swapped to stripping out the next section of wall, but after a while I had to give up on this too.  The last resort was pruning the apple trees in the orchard.  These haven’t been pruned in years and are probably well passed being saved, however, it is worth a shot.  I have attempted to thin out the canopy on each of the trees – particularly were a number of the branches had grown in on themselves.  Hopefully, this should bring some more light to the inner parts of the tree.  I also removed any branches that were growing downwards or were damaged.

There is a crab apple tree amongst the fruit trees.  Jo made some crab apple jelly a few weeks ago and we decided to collect some more for crab apple vodka – like sloe gin, but with crab apples and vodka.  Sounds a bit more interesting than jelly, but we will see.


Crab apples – these appear to be a yellow variety, other varieties are red

 The rain stopped, briefly, in the afternoon and I returned to the dry stone walling.  With such a long section, progress looks slow.  The first couple of courses are hard work since many of the larger stones go into the base of the wall.  It can be a bit disheartening.

Day 9 – Mud everywhere!

Dry stone walling – Day 8

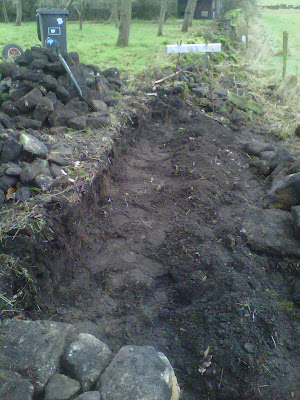
Back in the orchard again today.  The top photograph shows the part of the wall that I built last weekend – probably only a metre or so.  Today, I turned my attention to building this wall out.  Rather than just concentrating on one small section, I have dug out the foundations for the next 4 metre section.  It took about 3 hours to dismantle the existing wall and dig the foundations.  It took another hour to lay the foundation stones.

All in all, a good day. 

By concentrating on digging out the foundations, this will help speed up the building of the wall and also gets the foundations dug before the winter frost sets in and the ground freezes (making it difficult, if not impossible, to dig the foundations).

Last week’s wall in the background and the new foundations


Looking in the opposite direction showing the newly dismantled wall and new foundations

Now with the foundation stones


Introducing…..the Dualit mouse trap

Three events.  See if you can connect them.

Event 1: A few weeks ago we came down to breakfast to find that we had had a mouse in the kitchen.  The tell tale signs on the work surface.  Let’s not say anymore.  We discussed putting out a mouse trap, but never got around to it and the signs never re-appeared.

Event 2: At about the same time, the electrics in the house started to short out.  At first, I thought it was the dishwasher, but soon worked out that it was the toaster.  It was no big deal.  We can make toast on the Aga.

Event 3: Recently, there has been a strange smell in the kitchen.  The same corner where you will find the toaster.  Both of us had spotted it and both remarked it smelt as if something had died.

The answer:

The good news is that the toaster still works.  Can’t say the same for the mouse.

Budgeting: The big unknowns

One of the key things with the budgeting is trying to get it as accurate as possible. There are always going to be unknowns, so there is always going to be the need for some contingency.  However, if you can reduce the unknowns to the minimum, this is going to reduce the likelihood of any surprises.

So looking at the current estimates, there are a number of big unknowns…..

Problem

Issue

Mitigation

State of the existing roof

Will it need to be replaced? What condition are the roof trusses in?
We have looked in the loft (of No. 8 only) and the roof looks to be in fairly reasonable condition.  The roof trusses are nothing special (very plain), but the perlings look good.  Not sure that there is a lot of merit in opening up the roof space.  The cost of refurbing the existing roof is estimated at around £14,000, so not a huge sum relatively.
Foundations of the walls in the barn
Are there any foundations in the barn or has it been built directly onto the earth below.
We have no idea on this until work states.  In the budget, we have assumed the worst and included the costs of completely rebuilding the walls (to include foundations).
Condition of the septic tank
This was installed in the 1970’s.  It is an 800 gallon tank, so is plenty big enough, but what state is it in?  Also the design is fairly dated and the water simply soaks away into the bottom field.
The top seems pretty rotten, but it is clearly still operational.  We need to get a specialist in to provide some advice.  If the septic tank could last a couple of more years, it could be replaced at a later date.  Specialist help needed.
Floors (particularly upstairs in No. 8)
These are fairly “springy” in places and certainly do undulate.
Pulling back the carpets revealed some very poorly laid tongue and groove chipboard.  The underlying joists appear to be ok.  New floors required and included in estimates.
Refurb of the office space
Originally, the office space was going to be above the double garage that has now been removed from the plans due to costs.  The current plan is to build some office space into the existing coal hole.
The space is odd and quirky.  The walls are singled skinned (but original) and the floor is made up of flagstones.  There is some modern block work inside.  Some of this appears to be helping structurally.  Mark (the architect) to provide a quote.

Apple juice from the orchard

We collected about 4 large sacks of apples from the orchard a couple of weeks ago.  Rob North pressed the apples to use the juice for cider, but he dropped off a litre of apple juice yesterday afternoon.  It actually tastes remarkably alright – the apples were a little to sharp too eat, but the juice is very drinkable.

Juice from the orchard courtesy of Rob North

Dry stone walling – Day 7

I have started working in the top corner of the orchard.  On Day 6, I dismantled what was left of the existing wall and it is amazing how much stone can come out of such a small section of wall, particularly when many of them are deeply embedded in the ground – they must have fallen off the wall many years ago.
 
 
So Day 7 started with digging out the foundations.  This involves removing all of the stones down to the subsoil – you can tell when to stop because the soil changes colour.  All dug by hand with a pick and shovel. 
Day 7 – Foundations dug
I established the route of the wall by using a line along the existing part of the wall.  You can just see the yellow line in photograph above.  Once this is worked out, I put up the two end frames that define the angle (referred to as “batter”) of the wall – 600mm at the base of the wall and 300mm at the top of the wall.  The wall is 1 metre high (well, when measured from the other side of the wall that is lower.
Once the foundations are dug, it is time to build the wall – one layer at a time.  At the end of Day 7, the first metre of wall is up and the coping stones are now placed on top.
 
Another metre of wall

Day 7 – today’s efforts

Coping with the paperwork

Even though we have only just started the process we seem to be generating a lot of paperwork.  Plans, photographs, brochures and bills.  We decided to keep a large A4 diary since the start of the project and that has worked quite well until now.  However, we are starting to struggle to keep on top of all the paperwork, particularly since we took ownership (and now have a set of utility bills to pay.  Times two!).

So it was time to invest in a filing cabinet.  A simple, cheap two drawer filing cabinet.  Top drawer is for all the material that relates to the design of the renovation.  The bottom drawer is for all the information that relates to the running of the property – utility bills, council tax, etc.

It feels much better to have everything tucked away in the right place.

Budgeting: Starting the process

Before we submitted the plans to the planning department, we thought it might be a good idea to start pulling together some estimates.   We already had a budget that we were working to and this was part of the brief that we had given Mark, the architect.  However, there is no point in putting something through planning that you simply can’t afford to build.  This turned out to be a smart move. 

We engaged a Quantity Surveyor (QS) via the architect who took the Mark’s designs and produced a set of rough estimates.  These are based purely on the current designs and some prior knowledge of what it takes to build/renovate properties like these and in this part of the world.  In fact, the QS managed to produce a set of estimates without visiting the site – based purely on the work that needed to be done and the amount of space/materials involved.  At this stage, the estimates can only be very rough.

But they only need to be rough.  The initial set of figures showed that we were already over budget by about 20%.  While you can reduce costs by cutting back on some of the footprint, you aren’t going to save huge amounts.  We took the decision to lose the garage/office on the basis that this could be added in at a later date and it might also have been difficult to get through planning.  Getting rid of this element of the decision would also save time and money – the design of the garage/office was still only at a formative stage when we took the decision to scrap it.

However, the whole process did underline how important it is to understand your priorities and make compromises accordingly.  We still won’t know the final figures until once the planning permission has been granted – after all, some key parts of the design might get rejected and this could have a huge impact on the budget.

Dry stone walling – Day 6

Day six and time for a new location.  Having had some success with my initial attempts at dry stone walling, I have now turned to a location that is a lot more visible and will be seen by visitors to the house.  At least I know it will look half decent when finished!

The wall being rebuilt is the one to the left of the top photograph.  It is in pretty poor shape and has collapsed into the adjoining field.  The first job is to strip out all the existing stones and dig new foundations.  The fields are at slightly different levels – the adjoining field is around 18 inches lower than on my side.  There is a wire fence on the other side of the wall, but there is a 3 feet between the wall and the fence making it possible to work on that side without having to take the fence down.

Once the stones are removed, I have stacked them according to their size.  I put coping stones (the ones that go on top of the wall) to one side, then stack the others with the face of the stone facing upwards.  Smaller stones next to the coping stones and then the larger ones stacked closer to the wall – this means that I don’t have to carry the bigger stones as far.  By stacking the stones with their faces up, it means that selecting stones when rebuilding the wall becomes that much quicker.

Just starting to dismantle the wall on the left (yes, it is there under that mound)
 
The stacks of stones starting to grow – the coping stones are stacked furthest away from the wall as they go on last.
 
« Older posts

© 2024 Hagg Leys Farm

Theme by Anders NorenUp ↑