Category: log stoves (Page 2 of 2)

Firebelly FB1

We have just purchased a Firebelly FB1 for the Snug downstairs.  This will be fitted in the middle hearth in the existing cottages.

We have looked around and these stoves are a great fit for what we were looking for.  They are also made in Eland  – 10 miles or so away!  You will find more information on Firebelly stoves here: http://firebellystoves.com/

 Unfortunately, we can’t fit it just yet as there is a slight leak down the chimney.  We have identified  the problem and will hopefully get to fix it in the next week or so.

We aren't quite ready to install this stove yet.  Bit it won't be long!  This is Firebelly FB1 in pewter.  We have a stove pipe in the same colour to match.

We aren’t quite ready to install this stove yet. Bit it won’t be long! This is Firebelly FB1 in pewter. We have a stove pipe in the same colour to match.

Zep guarding the new stove!

Zep guarding the new stove!

Replacing the fireplace mantel

The chimney breast in number 10 was artexed.  I didn’t know why until I removed the artex – there was big crack running through the stone mantel from front to back.

The only real option was to replace it.  Luckily the builders managed to locate a similar stone mantel.  Holes were knocked into the chimney stack above the stone.  The chimney stack was then propped up while the stone was removed and replaced with the salvaged one.  It was quite quick and a good job to do while the weather was poor.

Once the sand and cement was set, the props were removed and the holes in the chimney stack were bricked up.

The fireplace mantel in number 10 was cracked and had to be replaced.

The fireplace mantel in number 10 was cracked and had to be replaced. There is a prop placed remporarily underneath the fireplace to ensure that it doesn’t go anywhere.

The stone mantel came from the Sycamore pub when it was refurbished.

The stone mantel came from the Sycamore pub when it was refurbished.

Installing the chimney pots and the flues

There are three fireplaces in the existing cottages.  Two of the fireplaces use the same chimney stack, so there are only two re-built chimney stacks for three fireplaces.

The chimneys were swept first and a significant amount of soot was removed (even though all of the existing fireplaces were gas when we moved in).  Next the chimney pot goes on the flagstone that was installed on the top of the chimney – 8 inch holes were cut in the flagstones to accept the flue.  Once the sand and cement had set, the flue was pushed down the chimney.  There is a metal cowl on the top.  This stops water and birds getting into the top of the chimney.  They don’t look particularly attractive (they are made of shiny metal), but they were lightly sprayed with black paint.

We could have used a “T” shaped clay pot, but opted for a straight pot with a cowl.

We have opted for straight clay pots rather than the "T" shaped pots

We have opted for straight clay pots rather than the “T” shaped pots

We have installed three 7 inch stainless steel flue in each of the existing fireplaces

We have installed three 7 inch stainless steel flue in each of the existing fireplaces

Log burning stoves

We have decided to install a ground source heat pump and underfloor heating throughout the property – both upstairs and downstairs – in addition, we are going to install a number of log burning stoves.  As well as looking good, they are a great way to provide additional heating should it be required.

All in all, there are potentially 5 locations for such stoves throughout the property:

  1. In the open plan lounge/kitchen in the new build part of the house;
  2. In the hall of number 10.  This is where the kitchen used to be and there is currently a log effect gas stove in an inglenook fireplace;
  3. In the lounge of number 10. This will become the snug with TV and AV.  There used to be a gas fire installed in a bricked up inglenook;
  4. In the lounge of number 8.  Used to have an old gas fire.  This will become a downstairs guest bedroom in the new house;
  5. In my office which is currently the coal hole in number 8!  This is currently a single skin building and will need to be rebuilt.  It is shown on the 1788 map, so we know it has been here a while.  We aren’t sure what we are going to do with this part of the building yet – part of the answer depends on the cost of rebuilding it.

Stoves 1 and 3 are likely to be used the most. Stove 4 is likely to be used the least.  And stoves 2 and 5 somewhere in between.  All the existing fireplaces work and are free of any problems.  Installing working stoves requires a stainless liner and some remedial buidling work.

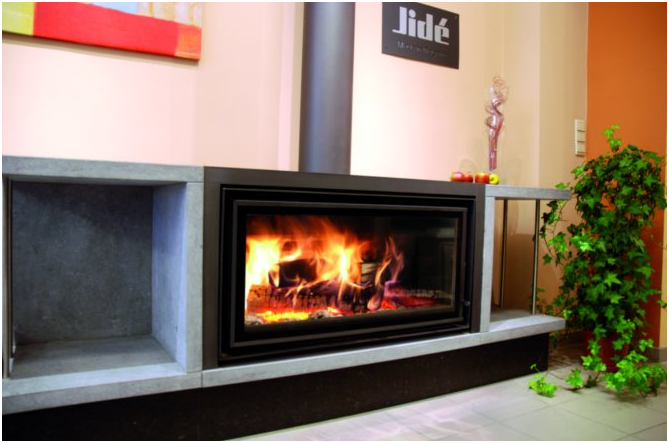
Stove 1: Open Plan lounge/Kitchen

This is in the new extension.  The outside will be built to match the materials in the existing building.  The interior will be contemporary.  There are three rooms in the extension – kitchen (double height), lounge (heitght and a half) and a separate master bedroom.  I reckon the volume of the kitchen and lounge combined is going to be in the order of 150 cubic meters.

Given that this is such a large space (ignoring the fact that it has underfloor heating) and is in the new part of the building, the choice is for something more contemporary. 

Stovax Studio Firebox

Stovax Studio Firebox

Stove 2: The new hallway

This is in the older part of the building.  The fireplace is made up of three large slabs of sandstone.  This currently houses a log effect gas fire.  The proposal would be to put a log stove in here.  Not sure exact what make or model.
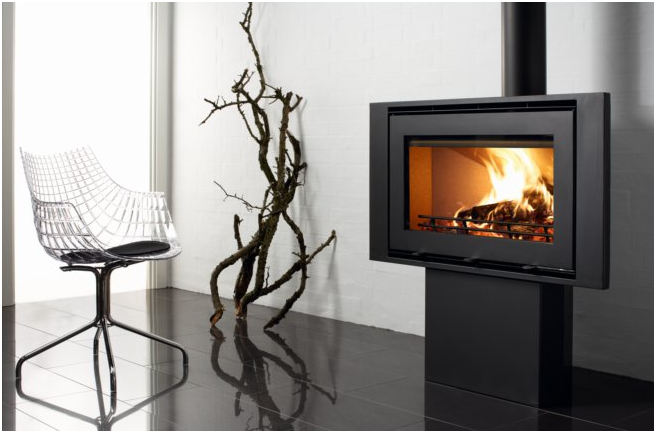
Stove 3: The snug

Again in the older part of the property in a large sandstone inglenook fireplace.  The proposal here is to put in a log stove, but something that isn’t compeltely traditional, but has some modern twist.  Maybe something like the Scan Andersen 8-2.

Scan Andersen 8-2

Scan Andersen 8-2

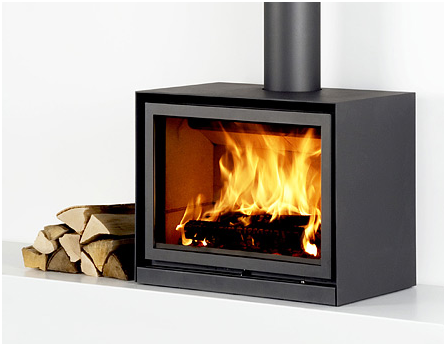
Stove 4: The downstairs guest bedroom

I don’t think this stove is going to be used very much.  The fireplace is one of the traditional sandstone slabs.  The proposal is for a Jotul F100.  This is a smaller stove than the others.  It is only 3KW and as such it does not require an air inlet.  Thus less building work.

Jotul F100

Jotul F100

Stove 4: Steve’s office space

There is no fireplace here, so the suggestion is to install a wall hung unit and have the flue do straight out through the wall and upwards.  Maybe something like the Scan 58 wall hung unit.

Scan 58 Wall Hung

Scan 58 Wall Hung

How big a log stove do you need?

The calculation required for the room in which the stove with be fitted is:

(Length x Width x Height) / 15 = Output Required (kW)

All measurements should be in metres. If there is excessive heat loss from the room through windows, doors and stairways, a higher heat output would be recommended.

Scrapbook: Contemporary log stoves

I have started a set of pages that I am going to label up as “Scrapbook”.  These are pages with photos and links to websites where I have been interested in their products.  I will update them as I come across new products, but thought these might be useful for others.

So I am going to start with contemporary log stoves – nothing rustic about these – something clean and stylish for the main living space.  There will be underfloor heating, so this is really just to top up the temperature a bit on the colder days.


Firebelly – www.firebellystoves.com

Jide Decor – www.eurostove.co.uk

Saey – www.eurostove.co.uk

Stuv 16 – www.stuv.com


Westfire Uniq 23 – www.eurostove.co.uk
Newer posts »

© 2024 Hagg Leys Farm

Theme by Anders NorenUp ↑