Category: photographs (Page 2 of 4)

Goodbye sheds!!

Well, two of them anyway.  Now we have got planning permission, we can start to “tidy” the site up.  Although we don’t need planning permission to remove the sheds, part of the justification for the extension was predicated on sorting out the overall use of the land – we didn’t want to start on any of the “tidying up” until the plans had been approved.  There are 2 large sheds at the back of the property and 2 large sheds in the orchard.  This weekend the plan was to remove the two sheds at the back.

The sheds are of a wooden construction and I have no idea how old they are.  Let’s just say they are not modern!  During their lifetime, they have been moved (the insides had markings for left and right) and repaired.  Although much of the wooden was rotten in places, they were still remarkably robust.  The plan was to disassembling them and burn the wood on a bonfire.  They come apart reasonably easily – the roof comes off first and then the sides are bolted together.  The bolts in the first shed were easily removed, but completely rusted up in the second shed.  In the end, I used the chainsaw to cut out the bits that were bolted together.  The worst part of the process was removing the roofing felt off the roof panels before putting the wood on the fire.

Burning the wood is the most economic approach of disposing of the material.  If these sheds had gone into a skip, it would probably have cost in the order of £200 to get rid of the wood.  Burning the wood avoids this cost just leaving us with a pile of wood ash that can be put on the fruit trees.  It is amazing how little ash was generated by burning two sheds (as well as a pile of cuttings from the trees).

It took a day to dismantle and burn each of the sheds.  The bonfire was going for the entire weekend.  Removing the second shed has vastly improved the view down the valley.  Since it hadn’t been used in years (possibly as many as ten years), I have no idea why the previous owners hadn’t disposed of it years ago!  Anyway, it is gone now!  Only 2 more to go (in the orchard!).

Shed 1 in the foreground and Shed number 2 in the background

Shed 1 in the foreground and Shed number 2 in the background

Shed 1 minus the roof and gable end

Shed 1 minus the roof and gable end

Shed 1: Nothing but the roof left

Shed 1: Nothing but the roof left

Shed 2: Roof half gone

Shed 2: Roof half gone

Inside Shed 2 with the roof off.  The old bench and tools.

Inside Shed 2 with the roof off. The old bench and tools.

Shed 2 meets the chainsaw

Shed 2 meets the chainsaw

This is where all the wood from the sheds ended up

This is where all the wood from the sheds ended up

All that is left the following morning - a surprisingly small amount of ash

All that is left the following morning – a surprisingly small amount of ash


Dry stone walling – Day 17

More of the same.  I started the day with the foundation stones and 3 courses complete.  I ended the day by putting the coping stones on this 3 metre section of wall.  Jo came and gave me a hand sorting stones, filling buckets with smaller stones and helping with the hearting (filling the centre of the wall with smaller stones that jam the others in position).  This made a real difference to the amount that was completed today. 

Dry stone walling – Day 16

Well, I started on this section of wall on 11th November and have spent 10 working days on it to get to this point.  Christmas, bad weather and the flu all contributed to slowing things up. You can start to understand how labour intensive dry stone walling is – particularly compared to putting up a barbed wire fence.

Dry stone walling – Day 16
Both sides to the wall are faced in the same way – the only difference is that the other side of the wall is around 5 courses higher due to the difference in the field levels.
There are a number of imperfections in the wall.  Let’s face it, the whole process of building the wall is one of managing imperfection.  Having said that the coping stones on the far left of the wall need to come off and the last course on top of the wall needs to be levelled up before they are re-sited.  I think this is more obvious if you zoom in on the above image (by clicking on it) and taking a look at the far left end of the wall – it seems to starting reducing in height.  I have actually fixed this issue now and you will see this in later photographs of this part of the wall.

Dry stone walling – Day 15

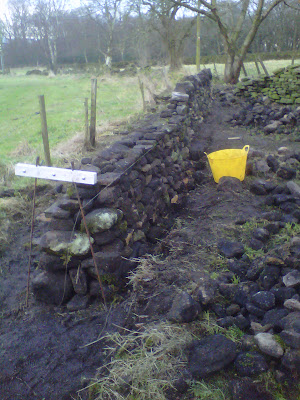
It has been wet today.  Really wet.  However, by the end of the day there is only a couple of courses to go and the coping stones can go on this part of the wall.  Once you pass the midpoint on the wall (and install the throughstones), the whole process seems to speed up – not surprising considering the top of the wall is only half the width of the base of the wall.

While it has been relatively warm today, it has been really windy and wet.  This has made working outside hard work.  The main issue is that the ground surrounding the base of the wall becomes very muddy and slippery – you would not want to slip carrying a heavy stone.  I made a “duck board” using some spare wooden decking.  This works a treat, although it could do with being a bit longer.

I reckon one more day and we will be ready to put the coping stones on the top of the wall.

Day 15 and a “duck board” to combat the mud!
 

Dry stone walling – Day 14

Yup, back to dry stone walling after an enforced break for a dose of man flu and Christmas!

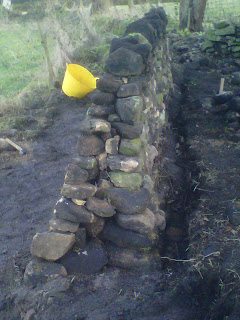
It is back to laying foundation stones and the first few courses.  This is a slow process as the base of the wall is at it’s widest at the bottom.  The fact that the field levels are slightly different also doesn’t help.  The weather was relatively warm, but the downside was that it rained later in the afternoon.

Day 14
Day 14

Roof space

The roof space is effectively three roof spaces – one for each of the cottages.  Two end walls with a wooden “A” frame in between the two.  The “A” frames look in reasonable condition.  I have had a look in the roof space in one of the other cottages and the construction is the same.

The roof is constructed using traditional stone slates (called Yorkshire Greys).  These have a single hole in the top and a wooden peg that us used to hook them over wooden battens.

I have no idea what this tells us about the date of the construction.  The one thing that strikes me as odd is that the end walls seem to have been painted.  Not quite sure why anyone would want to want inside the roof space.

Dry stone walling – Day 13

It has been very wet recently and that area around where I have been working is very muddy and slippery.  I have decided not to do any dry stone walling here while it is so wet – a slip in the mud carrying a large stone could very easily spell disaster. 

With such much wall to repair around the property,  I thought I would turn my attention to a spot that needed to be repaired.  In the top field, there is a piece of wall where the coping stones are only just clinging on.  I haven’t attempted just to repair a section of wall before, so I didn’t really know what to expect.  The key factor seems to limit the amount of wall that needs to be repaired! As soon as I removed a couple of the coping stones, a whole section of wall collapsed.  You need to have your wits about you and do wear a pair of steel toe cap boots.

The section of wall needing repair.  This photo was taken last summer.

I put the coping stones to one side.  Separated out the building stones and put the hearting (there was a lot of it) in a wheel barrow.  All in all, it only took an hour to rebuild.  The most difficult thing was finding enough coping stones to cover the top of the wall.  I found some of them buried in the grass (this wall must have started falling about some time ago) and a few others elsewhere.

The repaired wall – a few more running joints that I really wanted, but I didn’t want to have to rebuild a huge section

Dry stone walling – Day 12

The latest section of wall in the orchard is now complete.  It is only 5m, but it is very rewarding to put the coping stones on.  It never seems to take very long – possibly just 15 mins – to put the coping stones on.  It is made all the easier by separating the coping stones as I have been rebuilding the wall.


Day 12 – Dry stone walling

Clearing the top field

In the top corner of the bottom field, the brambles and nettles had pretty much taken over.  It was very difficult to get access to this area in the summer due to the undergrowth.  Well, a couple of hours with a metal bladed strimmer soon had this area under control.
 
This part of the field is bordered by a small crag.  There are some trees that are growing either at the top of the crag, or in the crag itself.  Because of the canopy of the bigger trees, the smaller trees underneath have died.  I had one of these (an old Hawthorn tree) removed early in the week and cut the tree into logs.  It is amazing how much wood has come out of such a smallish tree – there were 4 wheelbarrows of logs from this single tree. 
 
Once the undergrowth has dried back a bit, I will burn this material on a bonfire.
 

Dry stone walling – Day 11

Yes, you guessed it! More dry stone walling.  The weather forecast was for a good day and we weren’t disappointed.  Cold and dry.  Problem was that it never got above freezing.  The ground was solid, but the foundations had already been dug, so I wasn’t too worried.  What I hadn’t planned for was the fact that all the stones had been frozen together.  I gave it a few hours and even a bit of sun on the stones didn’t make much of a difference.  Anyway, another 3-4 courses done today and I think another couple of days and we will be putting the coping stones on this section.

 
« Older posts Newer posts »

© 2024 Hagg Leys Farm

Theme by Anders NorenUp ↑